How to Clean Furnace Air Ducts Yourself

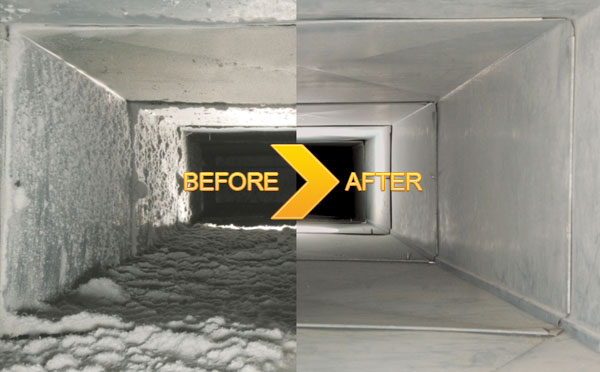
The cleanliness of your furnace air ducts will determine the quality of the air you’ll be enjoying in your home. Considering today’s health concerns, it is more important than ever to make sure that you’re breathing in clean air in the safety of your own home. For that reason, it is very important to perform duct cleaning regularly.
But could you clean your furnace air ducts yourself? The simple answer is: yes. Here’s how:
Measure the vent sizing.
Start by figuring out the size of the vent. This is done primarily to find out the size of the cover you’ll be cutting out later on. Just write down the size and set it aside for now. You might want to wear a mask at this stage of the process to minimize dust inhalation.
Detach the air duct covers.
Use a screwdriver and carefully remove the duct covers while keeping the return-air grill plates. Make sure to put the screws aside in a safe place – you don’t want to lose them for later.
Use a cloth or plastic to cover the supply vents.
Take the measurements you have and cut out a piece of cloth or plastic in roughly the same size. This is done to make sure that the dust doesn’t circulate all over your home. You can use a dry cloth to tape over the surface of the vent or some clear plastic wrap. Duct tape would help keep the cover in place as long as it doesn’t damage the wall surrounding the vent. You’ll have to remove this again later so it’s best not to put the screws back in place. Remember – this is something you’ll have to do for all the vents, not just one of them.
Turn the fan on.
The fan of the thermostat should be turned on to help loosen the dust that’s inside the vent. Since you have the main opening covered, you shouldn’t have any problem with the movement of dust. Note though that only the fan should be turned on. The cooling and heating capacity should both be off. If your thermostat doesn’t have a setting for just the fan, you can turn the heat on. This should also help loosen the dust.
Use a brush to agitate the dust.
Choose one vent and cut a brush-sized hole in it. Use this to put the brush inside so that you can lightly tap around the vent and loosen the dust. This will help make sure that the clumps of dust will detach from each other, and it will be easier to vacuum them all out later on.
Use a vacuum to suck in the dust.
Reach as far as you can with the vacuum and suck out all the dust hovering inside the vent. The vacuum won’t get everything, but it should remove all the fluttering dust.
Wipe with a microfiber cloth.
Most of the gunk would actually be removed with a damp microfiber cloth. Swipe it around the duct to capture every clog inside. Wash, rinse, and repeat. Be prepared because there’s a good chance you’ll do this several times before the vent becomes completely clean.
Turn off the power to clean the blower compartment.
Once done, shut off both the thermostat and the furnace. Don’t just shut down one because there are safety issues here. Once the power is off, it is now safe to take out the blower compartment and clean that out too. Don’t be surprised to see more gunk and dust on this part of the furnace air ducts. Most of the grime also passes this area. Use a combination of vacuum and microfiber cloth to clean.
Replace the filter.
Finally, replace the filter with a brand new one. These filters are often clogged, limiting the flow of air in your home. Ideally, these filters should be replaced on a routine basis – especially if you use the unit often. Replace the parts back together. The whole process should take several hours.
Of course, DIY duct cleaning may not always provide you with excellent results, especially if you’re not sure what you’re doing. Some vents may also contain surprises – such as mold or insects residing on the sides. This is why for a thorough job, it’s usually best to call in the professionals, especially if it’s been a long time since you have the ducts cleaned.


